It’s long time I don’t write anything on this blog, I was very busy in recent times, but now the time has come and I intend to regain the time lost.
When I came back to this blog, the first thing I noticed were the look & feel and the software engine on which it was based, SubText, a very old bog software, but still widely used, so I decided to move it to another platform, possibly in step with times, and my choice was WordPress.
Now this blog is based on WordPress engine the most popular online publishing platform, currently powering more than 20% of the web.
Here are the necessary steps (and troubleshooting) to move an entire blog content based on SubText to WordPress:
STEP 1: Subtext – Export your blog content
This is a “one choice” step, because SubText exports its content only in BlogML format, based on XML, and creates an XML file with all your posts, your categories and son forth. To accomplish this, logon to SubText as administrator, go to “Options > Import/Export” and click on the Save button. The check “embed attachment” must remain unchecked otherwise WordPress won’t be able to import the file.
The file’s content is base64 encoded, so I was recommended to convert it as normal text. Don’t worry, fortunately there always are other people who had before the same problem as you had. Not that writing a very little program that convert the file’s content from base64 encode to normal text is a particularly difficult task, but if things are already done it’s better! So if you surf here you can copy and past the code, compile it, run it, and have the file correctly converted.
STEP 2: WordPress – configure the permalink structure
This step is strongly recommended if you don’t want that the structure of all URL’s doesn’t change compared to the URL’s structure of the SubText blog.so as not to lose the Google indexing of your blog. Then the URL’s structure of the WordPress based blog must remain the same.
To accomplish this, you need to change the permalink structure in WordPress. After you login as administrator, go to “Settings > Permalink” and check “Custom structure”, then typing this URL structure:
/archive/%year%/%monthnum%/%day%/%postname%.aspx
This is exactly the URL’s structure used by SubText. Note the “ASPX” suffix, even if WordPress isn’t an ASP .NET application.
This picture may helps:

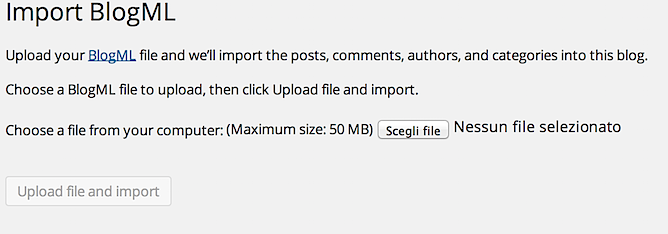
STEP 3: WordPress – import your blog using the BlogML WordPress plugin importer.
This plugin is built in into WordPress installation, so it’s nothing to download and install. Just click to “Tools > Import” and then choose BlogMl importer, upload the file XML generated at step 1 and click the button “Upload file and import”
Just a few seconds and your blog is imported in WordPress and is up and running!
STEP 4: WordPress – troubleshooting.
1) The BlogML Importer plugin doesn’t import blog categories correctly. They have been imported with the ID they had in SqlServer SubText repository in place of description. You must correct them manually.
2) The RSS Feed wasn’t generated correctly; the procedure ended with a XML parsing error, as shown in this picture:

and it seems to be related to some whitespace or blank lines into the various *.php files of the WordPress installation, or with custom permalinks that break RSS feed, like they said here
This problem was quite difficult to resolve and it took several time and Google searching.
Initially I founded this WordPress Fix plugin, I tried it but it fixed anything, on the contrary it said that my RSS feed was working well and that all was fine!
After an hour of Google searching, I found the solution in this Peter Krzyzek’s post, and I can never be grateful enough to the author for having solved this problem.
These are the steps you have to do:
– Download this: http://wejn.org/stuff/wejnswpwhitespacefix.php (this is a php file)
– Copy this file in the ROOT folder of your WordPress installation
– Edit the index.php file in the ROOT folder and add the followings:
include(“wejnswpwhitespacefix.php”);
after the first line, e.g. just after the <?php line
– Reload the page and….BOOM….IT WORKED!!!!!!
I don’t know anything about php, I’m a .Net developer, and without that post I will never solve this problem.
Thank you Peter!